I think their costumes turned out pretty cute! (I realize I'm a little biased though.) Hope everyone has a great night!
10.31.2009
10.26.2009
Spooky Treats
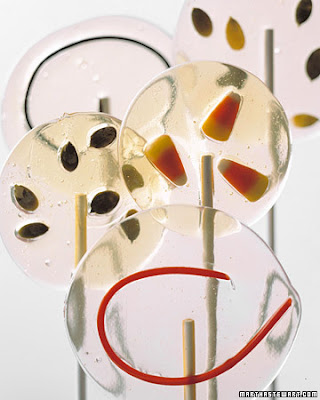
Where do I go when I need some Holiday inspiration? well, Martha Stewart of course! I've been in the mood to bake something and have found so many great, creative ideas all over the internet. Seriously, the creativity of people absolutely amazes me. I found so many fabulous ideas browsing through Martha's Halloween photo galleries and thought I'd share a few of my favorite.
So what did we end up making? Well, nothing that elaborate--just some Halloween sugar cookies. I bought some adorable Halloween cookie cutters, but when I went to use them we couldn't find them anywhere. So we improvised and used our little gingerbread cookie cutters and made mummies. They turned out pretty cute, and they must have tasted good because they were gone before I could get a good photo.
10.21.2009
Monster Mingle
So I absolutely adore cute monsters anytime of the year, but I thought now was as good of time as any to share some of my favorite monsters--especially since most people think of monsters most around this time of year. These may not be the most frightening monsters, because let's face it-- that is the last thing I need in this house, but they are guaranteed to bring smiles upon the faces of young and old alike. How fun would it be to get a loved one a non-sugary Halloween treat that can last all year long?!
The little creatures above are from Uglydolls. They are also being sold at Garnet Hill right now and really are the perfect accessory to their monster kids room.
These colorful little guys are the wonderful creations of Jennifer Strunge over at Cotton Monster. Each monster is a one of a kind made from recycled textiles.
Now if you have some knitting skills and feel like making a little monster friend of your own, you need to stop by the DangerCrafts Shop over at Etsy. Her knitting patterns are simply adorable!
10.20.2009
Pumpkin Picks
Lately I've been getting into the Halloween spirit, probably because I'm in the middle of (well more like the beginning of) making Halloween costumes. Sigh...I've got a lot to do, but I'd thought I'd procrastinate a little more and share some of my Halloween cheer. My posts over the next couple of weeks will be Halloween inspired, and what better way to kick it off than...PUMPKINS!
Here are a few pumpkins from Pumpkin Way carved by Nathan Wesling. All of his jack o' lanterns have such wonderful expressions, definitely check out his site if you're looking for some great faces!
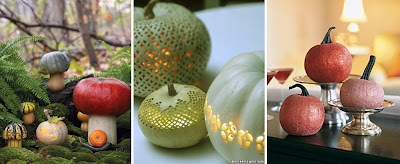
I can always count on Martha Stewart for some gorgeous inspiration. I'm especially loving the toadstool and snail pumpkins on the left--so creative and cute! The lace pumpkins (middle) or glitter pumpkins (right) would look absolutely beautiful too though. (Although I don't think I could carve that intricate lace.)
For those that don't feel like carving pumpkins, I'm loving these no carve pumpkins from BHG too! Use an apple corer (top left) to make perfectly round holes and mix and match using different colored pumpkins and gourds. Using a doily as a stencil (top right) would be a much simpler way to achieve that gorgeous lace look. Using sequins or ribbons to accessorize your pumpkin can give you some gorgeous results (bottom left), but the idea of making "mumkins" (bottom right) is totally ingenious!
Now these have really got me thinking about what I want to do with my pumpkins, now I just need to make the trip to the pumpkin patch.
10.15.2009
Alice in Wonderland Fashion Shoot
While I'm on my Alice in Wonderland kick today, I thought I'd also share some gorgeous photos of an Alice in Wonderland fashion shoot for Vogue (December 2003) by one of the all time greats, Annie Lebovitz.
Alice Inspired
I just finished reading Adventures of Alice in Wonderland again, and thought I'd share some Alice inspired finds with you today. I love so many classic children's novels, but Alice has got to be one of my favorites. Not only is the story is over-the-top creative, but it inspires so many beautiful things. Here are a few of my latest favorites...
Who wouldn't want to sit down and eat with this Alice in Wonderland Dinnerware featuring the classic Tenniel illustrations? This set can be found over at Fishs Eddy.
I'm also loving this Alice Toile Laptop bag also based on the Tenniel illustrations. This bag is designed by BabaLaptopbags over at Etsy. Absolutely gorgeous!
Or how about the creations of Vincent Thomas Leman found over at Dust Furniture? They're absolutely stunning and totally make me think of something you'd find in Wonderland.
I'm also loving this Alice Series print by The Black Apple, also found over at Etsy. Love, Love, Love this artist's work!
I'm sure we will be seeing a lot more Alice inspired things in the near future with Tim Burton's Alice in Wonderland movie coming out soon. Can't wait to see where he takes it! I love seeing how one little story can inspire so many different people and things.
10.12.2009
Crayon Makeover
I like to encourage as much creativity around here as I can, which means go through what seems like an extrordinary amount of crayons. We've been building quite the collection of broken crayons, and I finally found something to do with them. We gave all our old broken crayon pieces a makeover, and made them better than new!
To start with you'll need to gather the following supplies:
--All the broken crayons
--A mold (we used soap molds, but you could use candy molds--as long as you don't plan on using it for food again!)
--Scissors (or some sort of tool to break the crayons into smaller pieces)
--Oven
Once you have all of your crayons together, rip off all the wrappers and sort them by colors. Then with an adults help cut the crayons into smaller pieces, so they will melt easier. Preheat your oven to about 150 degrees or as low as it can go. (Our oven would only go as low as 170 degrees.) Now that our pieces are small, its time to put them in our mold. When designing your crayons, remember that you want them to be at least a crayon width thick. The thicker the crayon the sturdier. My kids had fun deciding what they wanted their crayons to look like. We decided we wanted bright multicolored crayons, but you could decide to make solid colored ones. Now stick your crayon filled molds into the oven and wait for the crayons to melt. It took our crayons about 30 minutes to melt together. The time totally depends on the size of your crayon pieces, the temperature of your oven, the shape of your mold, etc. So watch your crayons carefully! When they look melted, carefully take the molds out of the oven and set them out while they cool and harden. When they are dry and hardened go ahead and pop them out of the molds. Then you are ready to color with your new creations! Here are a few of ours...
I think they turned out pretty cute! The lighting wasn't the best in the photos, but you get the idea. My kids have loved them, and we will definitely be trying this again.
Remembering Grandma Noni
Sorry for the lack of posts lately, the past couple of weeks have been emotionally exhausting and blogging got pushed way off the list of priorities. This past weekend my grandma passed away at the age of 91. A couple of weeks a ago she was rushed to the hospital, and it went pretty quickly after that. She died surrounded by family and friends, and got to say goodbye to everyone. She was an incredible woman and it's been kinda fun to see the impact she has had on everyone around her.
It makes it a little easier knowing that she was ready to go and went peacefully (she couldn't wait to see my grandpa again after nine years,) but she will definitely be missed. No holiday or birthday will ever be the same, and she has definitely left a void in my life that will be impossible to fill. I am so grateful for all of the time that I was able to spend with her, and am so glad that my children got to know her so well too. I will always cherish my memories of her, and will never forget the things that she has taught me. She was a beautiful woman inside and out, and I consider myself lucky for having a grandma like her. I love her and miss her very much, but I know she isn't far and lives on in the hearts of all those who loved her.
Subscribe to:
Posts (Atom)


